To the Window to the Linux . . .
-
So this is an impromptu test that I had planned on doing in the future, but now am doing sooner.
So today I am ripping and burning some dvd’s. I am using a program called MakeMKV. It wasn’t finding the optical drive that was loading when I would start the program. I verified that the cdrom drive was indeed loading the DVD and accessible. I found that I had to add myself to the optical group, then I rebooted and the program started up and recognized the cdrom drive. I am now ripping a DVD and so far it is going splendid. When I did start up the program again, it did give me a SCSI error, but people were saying to ignore it has long as it is ripping the DVD appropriately. I haven’t burnt a DVD yet as that will be the next test.
Edit: In process of burning a DVD right now and so far it is going good. I just had to install three extra packages for K3b to function properly and the program had a popup window that told me which three packages to install. So far so good. It is writing the DVD image at 16x.
-
DVD rip and burn = Beautiful Success! - Minimal Effort
-
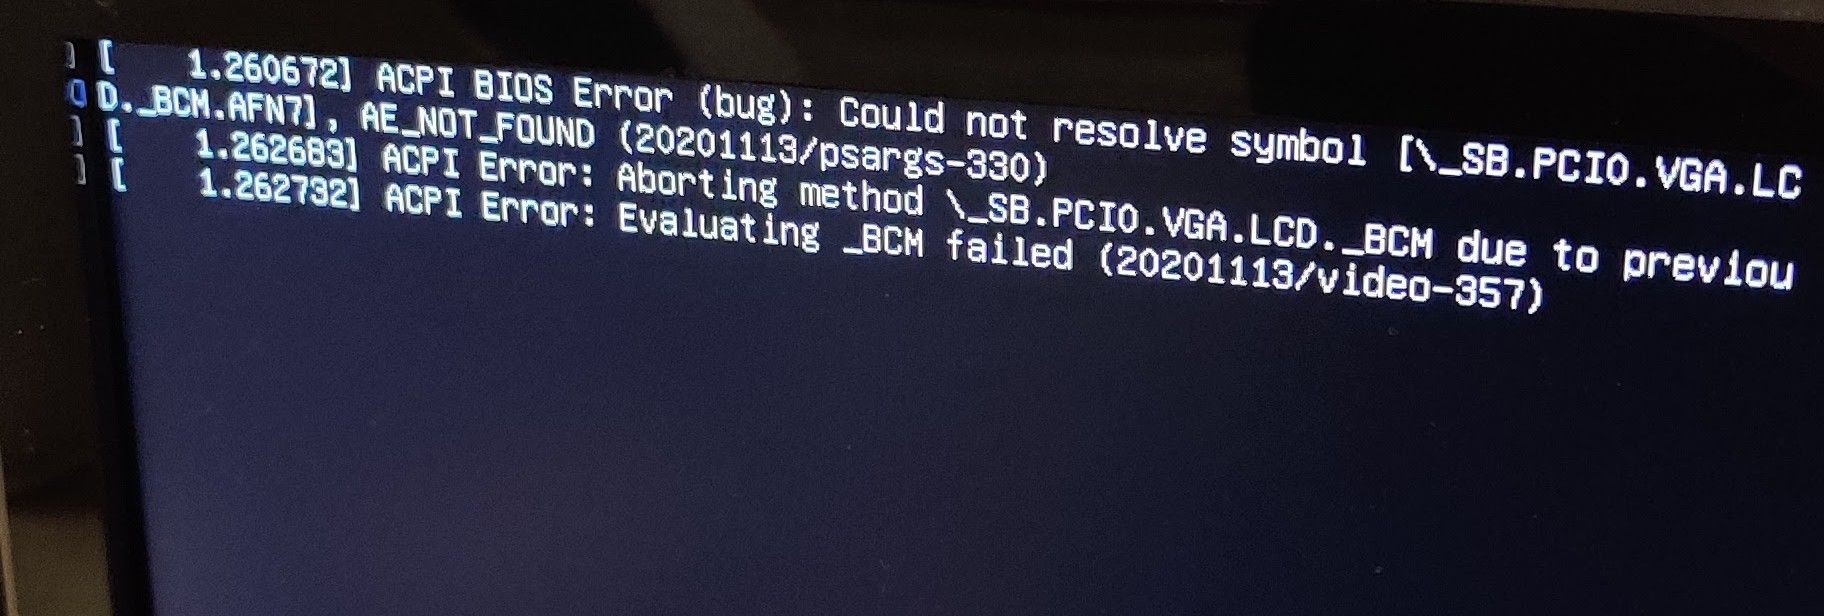
So I was able to finally resolve getting the video card driver figured out the other day. I thought I had it figured out by editing and adding some code the the grub file but that wasn’t actually working. Here is what I had to do. I should also say that this is for an AMD Radeon video card, that is over 10 years old.
When you install Arch using the archinstall script, you have the option of what video drivers to use. I chose the open source AMD video drivers. This installs the “mesa” package. But it doesn’t end there because you need to verify which driver is being loaded and running. Now before you do all of that, you also want to install lib32-mesa, xf86-video-amdgpu. You would use the following commands to install all of those if you are manually installing Arch.
sudo pacman -S mesa
sudo pacman -S lib32-mesa
sudo pacman -S xf86-video-amdgpuYou can also put the packages on one line with a space between each package. I just like to install things separately in case there is an error, it is easier to track down.
Now we need to see what video driver is being loaded. You will run the following:
lspci -k -d ::03xxFor me this resulted in the following:
01:00.0 VGA compatible controller: Advanced Micro Devices, Inc. [AMD/ATI] Curacao PRO [Radeon R7 370 / R9 270/370 OEM]
        Subsystem: ASUSTeK Computer Inc. Device 048d
        Kernel driver in use: amdgpu
        Kernel modules: radeon, amdgpu
This is what it should look like. Now when I ran it the first time, I received an error message, which told me that the incorrect driver was being loaded. So if you get anything other than the above, then most likely the amdgpu driver is loading. So the next step was to get that driver to load and run. It wasn’t as hard or as crazy as it might sound.
First I had to edit the mkinitcpio.conf file using the following:
sudo nano /etc/mkinitcpio.confIn this file you find the line
MODULES=(btrfs)and change it to the following:MODULES=(btrfs amdgpu radeon)making sure to put a space between each module name and making sure to putamdgpubeforeradeon. This line was also located at the very top of the file for me. You also want to make sure that thatmodconfis in theHOOKSline. You will have other hooks in there but ifmodconfisn’t listed then add it in the list so the line look similiar to this.HOOKS=(base udev autodetect microcode modconf kms keyboard keymap consolefont block filesystems fsck)Now save this file and exit out of it.
Next we will be creating two new files in
/etc/modprobe.dfolder. Of course you will want to look in that folder to make sure the files don’t exist already, but I doubt they will, because they didn’t for me. You will want to do the following:sudo nano /etc/modprobe.d/amdgpu.confIn that file copy and paste the following:
options amdgpu si_support=1
options amdgpu cik_support=1
Save the file and exit. Next you will create the following:
sudo nano /etc/modprobe.d/radeon.confIn that file copy and paste the following:
options radeon si_support=0
options radeon cik_support=0
Save the file and exit out. So with AMD video cards they had two different versions. One from the Southern Islands and one from the Sea Islands. Whether or not they are actually from islands with those names I don’t know. I didn’t go that far into it. I just wanted my games to play appropriately along with other video stuff. So by doing this you are ensuring that whichever one you have will load properly.
Once you have all of this completed, then you need to recompile the files so everything loads properly. Enter the following:
sudo grub-mkconfig -o /boot/grub/grub.cfgOnce this is finished running, which it doesn’t take long. Then reboot your computer and then run the above command again:
lspci -k -d ::03xxAnd you should get an actual description like this that displays:
01:00.0 VGA compatible controller: Advanced Micro Devices, Inc. [AMD/ATI] Curacao PRO [Radeon R7 370 / R9 270/370 OEM]
        Subsystem: ASUSTeK Computer Inc. Device 048d
        Kernel driver in use: amdgpu
        Kernel modules: radeon, amdgpu
The Kernel driver in use should say ```amdgpu`` or which ever driver that should be loading for you. Some people will have an NVIDIA card. I believe that would be a whole other set of instructions and maybe not even as much work. I don’t know the answer to that.
So I hope this helps anyone in the future to get their video card working properly. To test that it was working properly, I am able to run American Truck Simulator with no issues, The Elder Scrolls Online with no issues, and of course Minecraft Java version runs even better now as well.
-
So I was able to finally resolve getting the video card driver figured out the other day. I thought I had it figured out by editing and adding some code the the grub file but that wasn’t actually working. Here is what I had to do. I should also say that this is for an AMD Radeon video card, that is over 10 years old.
When you install Arch using the archinstall script, you have the option of what video drivers to use. I chose the open source AMD video drivers. This installs the “mesa” package. But it doesn’t end there because you need to verify which driver is being loaded and running. Now before you do all of that, you also want to install lib32-mesa, xf86-video-amdgpu. You would use the following commands to install all of those if you are manually installing Arch.
sudo pacman -S mesa
sudo pacman -S lib32-mesa
sudo pacman -S xf86-video-amdgpuYou can also put the packages on one line with a space between each package. I just like to install things separately in case there is an error, it is easier to track down.
Now we need to see what video driver is being loaded. You will run the following:
lspci -k -d ::03xxFor me this resulted in the following:
01:00.0 VGA compatible controller: Advanced Micro Devices, Inc. [AMD/ATI] Curacao PRO [Radeon R7 370 / R9 270/370 OEM]
        Subsystem: ASUSTeK Computer Inc. Device 048d
        Kernel driver in use: amdgpu
        Kernel modules: radeon, amdgpu
This is what it should look like. Now when I ran it the first time, I received an error message, which told me that the incorrect driver was being loaded. So if you get anything other than the above, then most likely the amdgpu driver is loading. So the next step was to get that driver to load and run. It wasn’t as hard or as crazy as it might sound.
First I had to edit the mkinitcpio.conf file using the following:
sudo nano /etc/mkinitcpio.confIn this file you find the line
MODULES=(btrfs)and change it to the following:MODULES=(btrfs amdgpu radeon)making sure to put a space between each module name and making sure to putamdgpubeforeradeon. This line was also located at the very top of the file for me. You also want to make sure that thatmodconfis in theHOOKSline. You will have other hooks in there but ifmodconfisn’t listed then add it in the list so the line look similiar to this.HOOKS=(base udev autodetect microcode modconf kms keyboard keymap consolefont block filesystems fsck)Now save this file and exit out of it.
Next we will be creating two new files in
/etc/modprobe.dfolder. Of course you will want to look in that folder to make sure the files don’t exist already, but I doubt they will, because they didn’t for me. You will want to do the following:sudo nano /etc/modprobe.d/amdgpu.confIn that file copy and paste the following:
options amdgpu si_support=1
options amdgpu cik_support=1
Save the file and exit. Next you will create the following:
sudo nano /etc/modprobe.d/radeon.confIn that file copy and paste the following:
options radeon si_support=0
options radeon cik_support=0
Save the file and exit out. So with AMD video cards they had two different versions. One from the Southern Islands and one from the Sea Islands. Whether or not they are actually from islands with those names I don’t know. I didn’t go that far into it. I just wanted my games to play appropriately along with other video stuff. So by doing this you are ensuring that whichever one you have will load properly.
Once you have all of this completed, then you need to recompile the files so everything loads properly. Enter the following:
sudo grub-mkconfig -o /boot/grub/grub.cfgOnce this is finished running, which it doesn’t take long. Then reboot your computer and then run the above command again:
lspci -k -d ::03xxAnd you should get an actual description like this that displays:
01:00.0 VGA compatible controller: Advanced Micro Devices, Inc. [AMD/ATI] Curacao PRO [Radeon R7 370 / R9 270/370 OEM]
        Subsystem: ASUSTeK Computer Inc. Device 048d
        Kernel driver in use: amdgpu
        Kernel modules: radeon, amdgpu
The Kernel driver in use should say ```amdgpu`` or which ever driver that should be loading for you. Some people will have an NVIDIA card. I believe that would be a whole other set of instructions and maybe not even as much work. I don’t know the answer to that.
So I hope this helps anyone in the future to get their video card working properly. To test that it was working properly, I am able to run American Truck Simulator with no issues, The Elder Scrolls Online with no issues, and of course Minecraft Java version runs even better now as well.
@Madchatthew Now THAT is a mammoth exercise! Great write up.
Mark
Founder - Phenomlab LtdExecutive Technology & Security Leadership
-
@Madchatthew Now THAT is a mammoth exercise! Great write up.
@phenomlab said in To the Window to the Linux . . .:
Now THAT is a mammoth exercise! Great write up.
Thank you very much! I appreciate it!! Hopefully, now it won’t be a mammoth project for someone else and they can get their video card working properly sooner.
-
I have to say that I am kind of impressed with the education programs that come with the KDE apps install. There is one for math and creating equations. Libre office has a math equation program as well. There is a chemistry periodic table app, that gives you different views and other features. There is a keyboarding app as well to get better/faster at typing. There are some other ones as well.
To get these installed in Arch Linux, go to your terminal and enter in the following:
sudo pacman -S kde-applications-metaThis will install all of the main KDE apps. Other flavors of Linux may already do this for you. If not a quick google search will show you how to install them.
@Madchatthew it’s hard to not be impressed by KDE. Still my favourite DE
Mark
Founder - Phenomlab LtdExecutive Technology & Security Leadership
-
 undefined phenomlab pinned this topic on
-
So lets take a stab at Fstab.
Fstab is located in
/etc/fstaband is used for loading local disk drives along with network drives as well. You don’t need to use fstab to access these drives. When you don’t use fstab then you will usually need to put your password in to access them. When you install Arch Linux the fstab file should contain your current drive that Arch is installed on, along with the partitions that were created. DO NOT TOUCH THOSE EXISTING LINES PLEASE! Doing so can render your OS unable to boot.We can however add any extra internal drives or network drives to the fstab to have them load automatically upon reboot and so we don’t have to enter the password every time. So the first thing we need to do is to find the hardware ID of the hard drive we want to add. This can be an internal hard drive, an external one or what have you.
To find the hardware ID type the following:
lsblk -fYou will get the following result:

What you see in the above image in the red box is the UUID of each hard drive device. So you would select the UUID of the device you want to add and copy it. I recommend pasting the ID into a note taking program like Kate or another note taking program.
In order to mount a drive we need to point it to a location so we can access it. So basically we are going to create a folder to point the hard drive too. Don’t worry it isn’t copying the data to your main drive, it is just linking to it so we can access the data.
First you want to create the directory using the following command:
sudo mkdir /mnt/nameofthefolderyouchoose| permissions will depend on file system and are addressed further down.I usually name the folder the same name that the hard drive is labeled. If it is a network drive, then I usually name it the same name as the shared folder on the network.
Next you will go into the fstab file with the following command:
sudo nano /etc/fstab| You will have to enter your password to save changes.You can use VIM or Neovim or whatever editor from the command prompt that works for you.
Arrow down to the bottom of the file. This is where you are going to add your entry. Now there are different entries depending on what format you have the hard drive formatted for. I will attempt to give some examples, but it may require testing and making changes depending on your setup.
This is what you would add for a file system using
btrfs:# /mnt/name of your hard drive UUID=copy/paste UUID of your device here /mnt/smoresdata btrfs defaults,relatime,compress=zstd:3,ssd,discard=async,space_cache=v2 0 0This is what you would add for a network share:
# Network Share
//SERVER_ADDRESS/SHARE_NAME /mnt/nameofyourfolder cifs username=YOUR_USER,password=YOUR_PASS,uid=1000,gid=1000, file_mode=0775,dir_mode=0775,x-systemd.automount,_netdev 0 0
To make this more secure you can create a file with a dot in front of it like
.credentialson your main drive. Then enter variables for the username name and password like below.username=your_username password = your_passwordThen, instead of using username and password typed out in your fstab, you would enter the following in place of that:
credentials=/path/to/file| remember if you put a dot in front of the filename you would put a dot in front of the filename in the path.Sometimes you will have to edit the lines you create if it doesn’t work the first time. Check your permissions, make sure something isn’t misspelled. Make sure you are using the name of the folder you created and troubleshoot. I use Google all the time to find my answers, which is how I came up with this and finally have a way better understanding of how fstab works.
You can use spaces or tabs for separation, it doesn’t matter. Now lets run through what each thing does.
UUID - hard drive ID
Path - path to folder you are mounting the drive to
defaults - includes rw, suid, dev, exec, auto, nouser, and async
relatime - stamps times to file access
noatime - Improves performance by not updating file access times.
compress=zstd - Enables zstd compression, which is fast and efficient. Other options like compress=lzo - are also available but zstd is generally recommended.
subvol=your_subvolume_name - Specifies which subvolume to mount. For example, subvol=@ - would mount the subvolume named @.
ssd - Enables optimizations for solid-state drives, but it’s recommended to use ssd=… for newer kernels if you have an SSD.
commit: Sets the time interval for synchronizing data to permanent storage. The default is 30 seconds.
discard=async - Deletes blocks from the storage device asynchronously, which can improve performance for some drives.
rw - Mounts the filesystem in read-write mode. This is the default, so it is not strictly necessary to include.
quiet - Suppresses most of the verbose output from the kernel messages.
fsck - The fsck command is not applicable to Btrfs. Set the last two fields to 0 0 in your fstab entry.
space_cache - The space_cache option is now space_cache=v2 by default in newer kernels, so you don’t need to explicitly set it in your fstab.Folder/File Permissions
With the btrfs file system, you will change the owner/group and file permission directly on the folder you created in the /mnt directory. You would use the following and adjust the permissions accordingly to what you want.
sudo chown -R root:group /mnt/nameoffolderforbtrfsdriveNote that I leave the owner as root but I do create a group and add all the users that should have access to that folder to the group I created.
Add a group -
sudo groupadd nameofgroupyouwanttocreate
Add user to group -sudo usermod -aG groupname usernameAdd the file permissions:
sudo chmod -R 775 /mnt/nameofyourfolderTake note that for network shares you DO NOT change owner/permission to the folder you created in the /mnt folder. It won’t work, you have to use the permissions in the fstab file.
These are the steps that I used with much troubleshooting and pulling out of hair. I hope that this will save you from becoming bald like me. Thank you and Linux on!
-
So lets take a stab at Fstab.
Fstab is located in
/etc/fstaband is used for loading local disk drives along with network drives as well. You don’t need to use fstab to access these drives. When you don’t use fstab then you will usually need to put your password in to access them. When you install Arch Linux the fstab file should contain your current drive that Arch is installed on, along with the partitions that were created. DO NOT TOUCH THOSE EXISTING LINES PLEASE! Doing so can render your OS unable to boot.We can however add any extra internal drives or network drives to the fstab to have them load automatically upon reboot and so we don’t have to enter the password every time. So the first thing we need to do is to find the hardware ID of the hard drive we want to add. This can be an internal hard drive, an external one or what have you.
To find the hardware ID type the following:
lsblk -fYou will get the following result:
What you see in the above image in the red box is the UUID of each hard drive device. So you would select the UUID of the device you want to add and copy it. I recommend pasting the ID into a note taking program like Kate or another note taking program.
In order to mount a drive we need to point it to a location so we can access it. So basically we are going to create a folder to point the hard drive too. Don’t worry it isn’t copying the data to your main drive, it is just linking to it so we can access the data.
First you want to create the directory using the following command:
sudo mkdir /mnt/nameofthefolderyouchoose| permissions will depend on file system and are addressed further down.I usually name the folder the same name that the hard drive is labeled. If it is a network drive, then I usually name it the same name as the shared folder on the network.
Next you will go into the fstab file with the following command:
sudo nano /etc/fstab| You will have to enter your password to save changes.You can use VIM or Neovim or whatever editor from the command prompt that works for you.
Arrow down to the bottom of the file. This is where you are going to add your entry. Now there are different entries depending on what format you have the hard drive formatted for. I will attempt to give some examples, but it may require testing and making changes depending on your setup.
This is what you would add for a file system using
btrfs:# /mnt/name of your hard drive UUID=copy/paste UUID of your device here /mnt/smoresdata btrfs defaults,relatime,compress=zstd:3,ssd,discard=async,space_cache=v2 0 0This is what you would add for a network share:
# Network Share
//SERVER_ADDRESS/SHARE_NAME /mnt/nameofyourfolder cifs username=YOUR_USER,password=YOUR_PASS,uid=1000,gid=1000, file_mode=0775,dir_mode=0775,x-systemd.automount,_netdev 0 0
To make this more secure you can create a file with a dot in front of it like
.credentialson your main drive. Then enter variables for the username name and password like below.username=your_username password = your_passwordThen, instead of using username and password typed out in your fstab, you would enter the following in place of that:
credentials=/path/to/file| remember if you put a dot in front of the filename you would put a dot in front of the filename in the path.Sometimes you will have to edit the lines you create if it doesn’t work the first time. Check your permissions, make sure something isn’t misspelled. Make sure you are using the name of the folder you created and troubleshoot. I use Google all the time to find my answers, which is how I came up with this and finally have a way better understanding of how fstab works.
You can use spaces or tabs for separation, it doesn’t matter. Now lets run through what each thing does.
UUID - hard drive ID
Path - path to folder you are mounting the drive to
defaults - includes rw, suid, dev, exec, auto, nouser, and async
relatime - stamps times to file access
noatime - Improves performance by not updating file access times.
compress=zstd - Enables zstd compression, which is fast and efficient. Other options like compress=lzo - are also available but zstd is generally recommended.
subvol=your_subvolume_name - Specifies which subvolume to mount. For example, subvol=@ - would mount the subvolume named @.
ssd - Enables optimizations for solid-state drives, but it’s recommended to use ssd=… for newer kernels if you have an SSD.
commit: Sets the time interval for synchronizing data to permanent storage. The default is 30 seconds.
discard=async - Deletes blocks from the storage device asynchronously, which can improve performance for some drives.
rw - Mounts the filesystem in read-write mode. This is the default, so it is not strictly necessary to include.
quiet - Suppresses most of the verbose output from the kernel messages.
fsck - The fsck command is not applicable to Btrfs. Set the last two fields to 0 0 in your fstab entry.
space_cache - The space_cache option is now space_cache=v2 by default in newer kernels, so you don’t need to explicitly set it in your fstab.Folder/File Permissions
With the btrfs file system, you will change the owner/group and file permission directly on the folder you created in the /mnt directory. You would use the following and adjust the permissions accordingly to what you want.
sudo chown -R root:group /mnt/nameoffolderforbtrfsdriveNote that I leave the owner as root but I do create a group and add all the users that should have access to that folder to the group I created.
Add a group -
sudo groupadd nameofgroupyouwanttocreate
Add user to group -sudo usermod -aG groupname usernameAdd the file permissions:
sudo chmod -R 775 /mnt/nameofyourfolderTake note that for network shares you DO NOT change owner/permission to the folder you created in the /mnt folder. It won’t work, you have to use the permissions in the fstab file.
These are the steps that I used with much troubleshooting and pulling out of hair. I hope that this will save you from becoming bald like me. Thank you and Linux on!
-
@Madchatthew great guide!
@phenomlab thank you very much!
-
So latest update on running Arch Linux as my daily driver for pretty much everything now. Except for work, I can’t control that, but they give me a laptop and I have to use windows on it. So on the desktop computer which has a graphics card that AMD isn’t supporting anymore and is over 10 years old, I updated Linux and it installed the new KDE Plasma and the mouse pointer is all glitched out. I did some research and it is a known issue that will be fixed in the next patch when they come out with it. I did try some work arounds but they didn’t work and it has to do with the old AMD video card that I have. So just waiting for that fix. Otherwise, it is still usable of course, just a little annoying with the glitched mouse pointer.
@Madchatthew Yes, surprising how even the smallest thing catches your eye.
Mark
Founder - Phenomlab LtdExecutive Technology & Security Leadership
-
Just wanted to say that it has been fun making my mom learn Arch Linux by switching the church school computers over to it where she assists.
-
So I love how you can do Linux updates right from the terminal. And if something is updating that you don’t want, you can type the name of that program in the pacman.conf file on the ignore line. I am using Arch so that is why it is the pacman.conf. I am sure other flavors of Linux have their own ways to be able to ignore a program during an update.
It is also super easy to revert back to a previous version if after an update something doesn’t work.
You would use the following command:
sudo pacman -U /var/cache/pacman/pkg/package_name-old_version-x86_64.pkg.tar.zstYou want to make sure to use the name of the file and the
.zstfile. You can also take this version of the file and copy it to another spot on your hard drive like Downloads or a second hard drive so that way in case your pacman cache gets cleared you will have it.I have done this with Wine for several versions because the game I wanted to play wouldn’t run. So I waited about a month to a month and a half and then updated to the newest version and then the game worked. It was so easy and fast to revert to the previous version and tell the system to ignore that program when doing updates.
-
So I have an update on this. I just found out just now that although you can manually go through each AUR install you have and git pull the latest updates and then use
makepkg -s -ito create a new install and then install the package, and that perhaps I was to hasty in pushing not to install the yay package just to have one less piece of software installed.I just updated my computer to the latest Linux version using
sudo pacman -Syuand my computer wouldn’t start back up to the graphical interface. So I pressedctl+alt+F3to get into a terminal. I downgraded,sudo pacman -U file:///var/cache/pacman/pkg/package-old_version.pkg.tar.zstback down to the previous version, hoping that would work, and it didn’t work. Still froze at the same spot. So went back into the terminal and connected to the wireless network usingsudo nmcli device connect "interface name"then entered the password and connected back to the internet.Then I decided to install yay because I was getting a error when it was trying to compile the nvidia driver to the new version of Linux and it wasn’t working. So I installed yay using
git clone https://aur.archlinux.org/yay.git. Then I went into the folder and used themakepkg -s -ito compile and install.Here is where all the magic happened that I didn’t realize should be happening. So I typed
yay -Syu- note that you don’t use sudo with yay, since the AUR packages aren’t officially build by the official Linux peeps and you shouldn’t be using sudo privledges to install their packages - and there were several things that needed to be updated, including the compiling program and some other things and a couple of other packages to make everything work. I found that the video graphics driver I need to use for this computer needed to be upgraded for it to work with the new version of Linux.So now my upgrade process goes like this. And yes, I do them in this order.
yay -Syu- This ensures the latest and all packages are installed from the AUR
sudo pacman -Syu- This installs all of the official Arch Linux packages for the system to work.So I hope others can learn from my mistakes and misgivings.
@Madchatthew ouch. Sounds nasty. Did you get to the bottom of why it happened?
Mark
Founder - Phenomlab LtdExecutive Technology & Security Leadership
-
@Madchatthew ouch. Sounds nasty. Did you get to the bottom of why it happened?
@Madchatthew ouch. Sounds nasty. Did you get to the bottom of why it happened?
I believe it is due to not everything getting upgraded because i wasn’t checking on the different packages I had installed from the AUR. Then when I ran yay it was like, hey would you like to update all of these things that you haven’t updated in months, perhaps years or ever for that matter and I was like yes please

If you don’t have yay there are no notifications that you need more updates than what you realize. Chrome was staying updated because it would give me a notification, but there was the nvidia package that needed to be upgraded as well and I had never upgraded it. I didn’t realize it and should have. Then some of those packages use cmake and that needed to be updated as well. So using yay is beneficial to make sure you get all the updates you need.


Hello! It looks like you're interested in this conversation, but you don't have an account yet.
Getting fed up of having to scroll through the same posts each visit? When you register for an account, you'll always come back to exactly where you were before, and choose to be notified of new replies (either via email, or push notification). You'll also be able to save bookmarks and upvote posts to show your appreciation to other community members.
With your input, this post could be even better 💗
Register Login