At work, we are transitioning from NodeBB for our Knowledge Base to Halo ITSM, which we require for SOC2 compliance amongst other things. Because I had 165 articles in NodeBB I didn’t want to have to re-type, or even copy and paste, I decided to write a Python script to walk the target category and create a file for each.
Here’s the script to complete that. There are a number of prerequisities here, which I’ve identified below
import os
import re
import time
import requests
import html2text
from datetime import datetime
# --- CONFIGURATION ---
# Your Forum URL goes here
BASE_URL = "https:/yourforum.com"
#The category ID you want to target goes here
CATEGORY_ID = 3
# In my case, I needed to define a new "home" for the exported files under `/public/uploads` as this contained all the images I needed to embed into the new flat files. Therefore, ASSET_DOMAIN is nothing more than a basic website where I can grab the images from afterwards.
ASSET_DOMAIN = "https://assetlocation.com"
# The below directories are created at the same level as the script. If they do not exist, you need to create them. They will contain both `HTML` and `markdown` copies of the posts.
HTML_DIR = "nodebb_export_html"
MD_DIR = "nodebb_export_markdown"
os.makedirs(HTML_DIR, exist_ok=True)
os.makedirs(MD_DIR, exist_ok=True)
h = html2text.HTML2Text()
h.ignore_links = False
h.body_width = 0
page = 1
total_exported = 0
print(f"🔄 Starting export for category {CATEGORY_ID} from {BASE_URL}")
while True:
print(f"📄 Fetching page {page}...")
url = f"{BASE_URL}/api/category/{CATEGORY_ID}?page={page}"
res = requests.get(url, timeout=10)
if res.status_code != 200:
print(f"❌ Failed to fetch page {page}: {res.status_code}")
break
data = res.json()
topics = data.get("topics", [])
if not topics:
print("✅ No more topics found. Export complete.")
break
for topic in topics:
tid = topic['tid']
title = topic['title']
print(f"→ Exporting topic {tid}: {title}")
topic_url = f"{BASE_URL}/api/topic/{tid}"
topic_res = requests.get(topic_url, timeout=10)
if topic_res.status_code != 200:
print(f"⚠️ Failed to fetch topic {tid}")
continue
topic_data = topic_res.json()
posts = topic_data.get("posts", [])
tags = topic_data.get("topic", {}).get("tags", [])
tag_list = ", ".join(tags) if tags else ""
safe_title = title.replace(' ', '_').replace('/', '-')
html_file = f"{HTML_DIR}/{tid}-{safe_title}.html"
md_file = f"{MD_DIR}/{tid}-{safe_title}.md"
# --- HTML EXPORT ---
with open(html_file, "w", encoding="utf-8") as f_html:
f_html.write(f"<html><head><title>{title}</title></head><body>\n")
f_html.write(f"<h1>{title}</h1>\n")
if tag_list:
f_html.write(f"<p><strong>Tags:</strong> {tag_list}</p>\n")
for post in posts:
username = post['user']['username']
content_html = post['content']
timestamp = datetime.utcfromtimestamp(post['timestamp'] / 1000).strftime('%Y-%m-%d %H:%M:%S UTC')
pid = post['pid']
# Rewrite asset paths in HTML
content_html = re.sub(
r'src=["\'](/assets/uploads/files/.*?)["\']',
rf'src="{ASSET_DOMAIN}\1"',
content_html
)
content_html = re.sub(
r'href=["\'](/assets/uploads/files/.*?)["\']',
rf'href="{ASSET_DOMAIN}\1"',
content_html
)
f_html.write(f"<div class='post'>\n")
f_html.write(f"<h3><strong>Original Author: {username}</strong></h3>\n")
f_html.write(f"<p><em>Posted on: {timestamp} | Post ID: {pid}</em></p>\n")
f_html.write(f"{content_html}\n")
f_html.write("<hr/>\n</div>\n")
f_html.write("</body></html>\n")
# --- MARKDOWN EXPORT ---
with open(md_file, "w", encoding="utf-8") as f_md:
# Metadata block
f_md.write(f"<!-- FAQLists: Knowledge Base -->\n")
if tag_list:
f_md.write(f"<!-- Tags: {tag_list} -->\n")
f_md.write("\n")
f_md.write(f"# {title}\n\n")
for post in posts:
username = post['user']['username']
content_html = post['content']
timestamp = datetime.utcfromtimestamp(post['timestamp'] / 1000).strftime('%Y-%m-%d %H:%M:%S UTC')
pid = post['pid']
# Convert HTML to Markdown
content_md = h.handle(content_html).strip()
# Rewrite asset paths
content_md = re.sub(
r'(!\[.*?\])\((/assets/uploads/files/.*?)\)',
rf'\1({ASSET_DOMAIN}\2)',
content_md
)
content_md = re.sub(
r'(\[.*?\])\((/assets/uploads/files/.*?)\)',
rf'\1({ASSET_DOMAIN}\2)',
content_md
)
f_md.write(f"**Original Author: {username}**\n\n")
f_md.write(f"_Posted on: {timestamp} | Post ID: {pid}_\n\n")
f_md.write(f"{content_md}\n\n---\n\n")
total_exported += 1
print(f"✔ Saved: {html_file} & {md_file}")
page += 1
time.sleep(1)
print(f"\n🎉 Done! Exported {total_exported} topics to '{HTML_DIR}' and '{MD_DIR}'")
Run the script using python scriptname.py.
If the script fails, it’s likely because you do not have the required modules installed in Python
import os
import re
import time
import requests
import html2text
In this case, you’d need to install them using (for example) pip install html2text
To get them into an Excel file where they can all be bulk imported, we’d then use something like the below script
import os
import re
import pandas as pd
from datetime import datetime
import markdown

# --- CONFIGURATION ---
export_dir = "nodebb_export_markdown"
output_file = "Halo_KB_Import_HTML.xlsx"
# This value can be whatever suits your needs
created_by = "Import"
today = datetime.today().strftime('%Y-%m-%d')

# --- BUILD DATAFRAME FOR HALO ---
import_rows = []

for filename in sorted(os.listdir(export_dir)):
    if filename.endswith(".md"):
        filepath = os.path.join(export_dir, filename)
        with open(filepath, "r", encoding="utf-8") as f:
            lines = f.readlines()

        # Default values
# Change "Knowledge Base" to reflect what you are using in Halo
        faqlists = "Knowledge Base"
        tags = ""

        # Parse metadata comments from top of file
        metadata_lines = []
        while lines and lines[0].startswith("<!--"):
            metadata_lines.append(lines.pop(0).strip())

        for line in metadata_lines:
            faq_match = re.match(r"<!-- FAQLists:\s*(.*?)\s*-->", line)
            tag_match = re.match(r"<!-- Tags:\s*(.*?)\s*-->", line)

            if faq_match:
                faqlists = faq_match.group(1)
            if tag_match:
                tags = tag_match.group(1)

        markdown_content = ''.join(lines)
        html_content = markdown.markdown(markdown_content)

        # Extract summary from filename
        summary = filename.split('-', 1)[1].rsplit('.md', 1)[0].replace('_', ' ')

        import_rows.append({
            "Summary": summary,
            "Details": html_content,
            "Resolution": "",
            "DateAdded": today,
            "CreatedBy": created_by,
            "FAQLists": faqlists,
            "Tags": tags
        })

# --- EXPORT TO EXCEL ---
df = pd.DataFrame(import_rows)
df.to_excel(output_file, index=False)

print(f"✅ Done! Halo HTML import file created: {output_file}")
This then generates a file called Halo_KB_Import_HTML.xlsx which you can then use to import each exported post into Halo.
This is the guide that I followed with setting up KDE Plasma on Linux. This guide shows how to install Arch manually and then goes from there to install KDE. One of the options with Arch after you boot up from a live usb is to use archinstall and that will have all your options that you can choose in a nice setup menu. You are able to choose KDE Plasma as one of the desktops to install from that setup. So you could skip the first part of the guide and then pick and choose which software and changes you would like to make from there following the guide.
First, devise a naming convention for your NTFY installation. This ideally should be a subdomain as it means you can logically and physically separate your main instance of NodeBB (for example) and make it work independently. This is highly recommended, as we will be using a reverse proxy to setup NTFY and some of those settings differ to what NodeBB already uses.
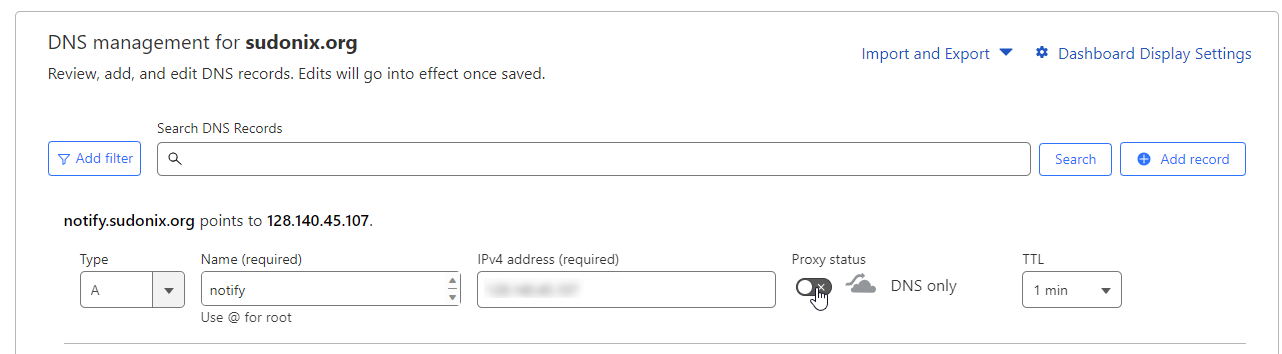
First, choose a subdomain you’d like to use – in my case, this will be notify.sudonix.org, and will point to the same IP address as the server hosting my NodeBB installation. You’ll obviously need to make changes to your DNS so that this works as intended. If you are using Cloudflare, you must disable the proxy.
Allow sufficient time for the DNS to replicate fully. I typically set a low TTL (Time To Live) where possible, and CF allows you to set as low as 60 seconds. You can check on DNS population progress using one of the many checkers available - this one is my go-to
Now that your DNS record has populated, you can start working on the NTFY build.
Depending on the version of Linux (or even Windows) you are using, there are a multitude of different packages you can use, including those maintained by Ubuntu / Debian themselves. For the purposes of this guide, I’m assuming Ubuntu / Debian, and this means you should use the below (as root)
At this point, we could run ntfy serve although this will start the communication on port 80 which isn’t what we want because it will conflict with NGINX, so we will need to change the port
sudo nano /etc/ntfy/server.yml
Make the below changes, obviously substituting my any details with your own
# All the things: Behind a proxy, Firebase, cache, attachments,
# SMTP publishing & receiving

base-url: "https://<your domain fqdn>"
listen-http: "127.0.0.1:2586"
cache-file: "/var/cache/ntfy/cache.db"
behind-proxy: true
attachment-cache-dir: "/var/cache/ntfy/attachments"
keepalive-interval: "45s"
Note that if you need to support iOS based devices, you must add the below directly under the base-url: line
upstream-base-url: "https://ntfy.sh"
Now issue ntfy serve and ensure that the instance starts with the correct port
A sample of the NGINX configuration will look like this
server {
    listen <your ip address>;
    server_name <your server name>;
    root <path to your home directory>
    location / {
        # Redirect HTTP to HTTPS, but only for GET topic addresses, since we want
        # it to work with curl without the annoying https:// prefix
        set $redirect_https "";
        if ($request_method = GET) {
            set $redirect_https "yes";
        }
        if ($request_uri ~* "^/([-_a-z0-9]{0,64}$|docs/|static/)" ) {
            set $redirect_https "${redirect_https}yes";
        }
        if ($redirect_https = "yesyes" ) {
            return 302 https://$http_host$request_uri$is_args$query_string;
        }

        proxy_pass http://127.0.0.1:2586;
        proxy_http_version 1.1;

        proxy_buffering off;
        proxy_request_buffering off;
        proxy_redirect off;

        proxy_set_header Host $http_host;
        proxy_set_header Upgrade $http_upgrade;
        proxy_set_header Connection "upgrade";
        proxy_set_header X-Forwarded-For $proxy_add_x_forwarded_for;

        proxy_connect_timeout 3m;
        proxy_send_timeout 3m;
        proxy_read_timeout 3m;

        client_max_body_size 0; # Stream request body to backend
    }
    ssl_certificate /home/sudonix.org/ssl.cert;
    ssl_certificate_key /home/sudonix.org/ssl.key;
}

server {
    listen <your ip address>:443 ssl http2;
    server_name notify.sudonix.org;
    root <path to your home directory>
    # See https://ssl-config.mozilla.org/#server=nginx&version=1.18.0&config=intermediate&openssl=1.1.1k&hsts=false&ocsp=false&guideline=5.6see https://ssl-config.mozilla.org/#server=nginx&version=1.18.0&config=intermediate&openssl=1.1.1k&hsts=false&ocsp=false&guideline=5.6
    ssl_session_timeout 1d;
    ssl_session_cache shared:MozSSL:10m; # about 40000 sessions
    ssl_session_tickets off;
    ssl_protocols TLSv1.2 TLSv1.3;
    ssl_ciphers ECDHE-ECDSA-AES128-GCM-SHA256:ECDHE-RSA-AES128-GCM-SHA256:ECDHE-ECDSA-AES256-GCM-SHA384:ECDHE-RSA-AES256-GCM-SHA384:ECDHE-ECDSA-CHACHA20-POLY1305:ECDHE-RSA-CHACHA20-POLY1305:DHE-RSA-AES128-GCM-SHA256:DHE-RSA-AES256-GCM-SHA384;
    ssl_prefer_server_ciphers off;

    ssl_certificate <path yo your certificate file>
    ssl_certificate_key <path yo your certificate key>

    location / {
        proxy_pass http://127.0.0.1:2586;
        proxy_http_version 1.1;

        proxy_buffering off;
        proxy_request_buffering off;
        proxy_redirect off;

        proxy_set_header Host $http_host;
        proxy_set_header Upgrade $http_upgrade;
        proxy_set_header Connection "upgrade";
        proxy_set_header X-Forwarded-For $proxy_add_x_forwarded_for;

        proxy_connect_timeout 3m;
        proxy_send_timeout 3m;
        proxy_read_timeout 3m;

        client_max_body_size 0; # Stream request body to backend
    }
}
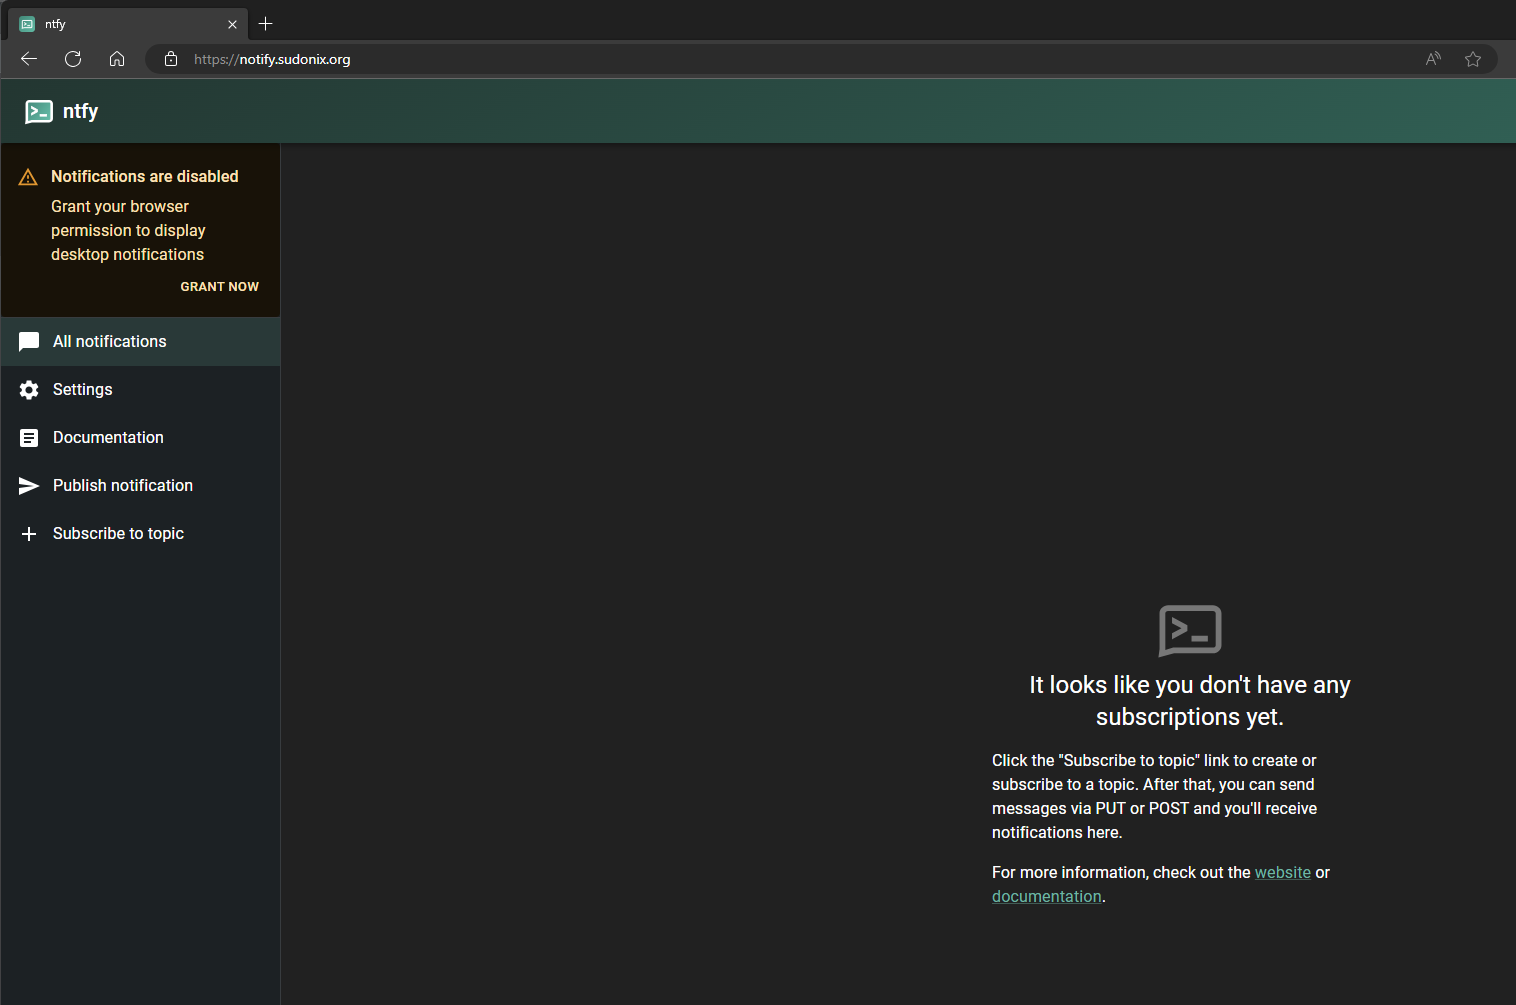
Obviously, you need to supply the information requested in <your information> as this pertains to your installation. Now save your config, ensure there are no errors, and in the console, issue ntfy serve. Now browse to the URL you want to use, and you should see something like the below
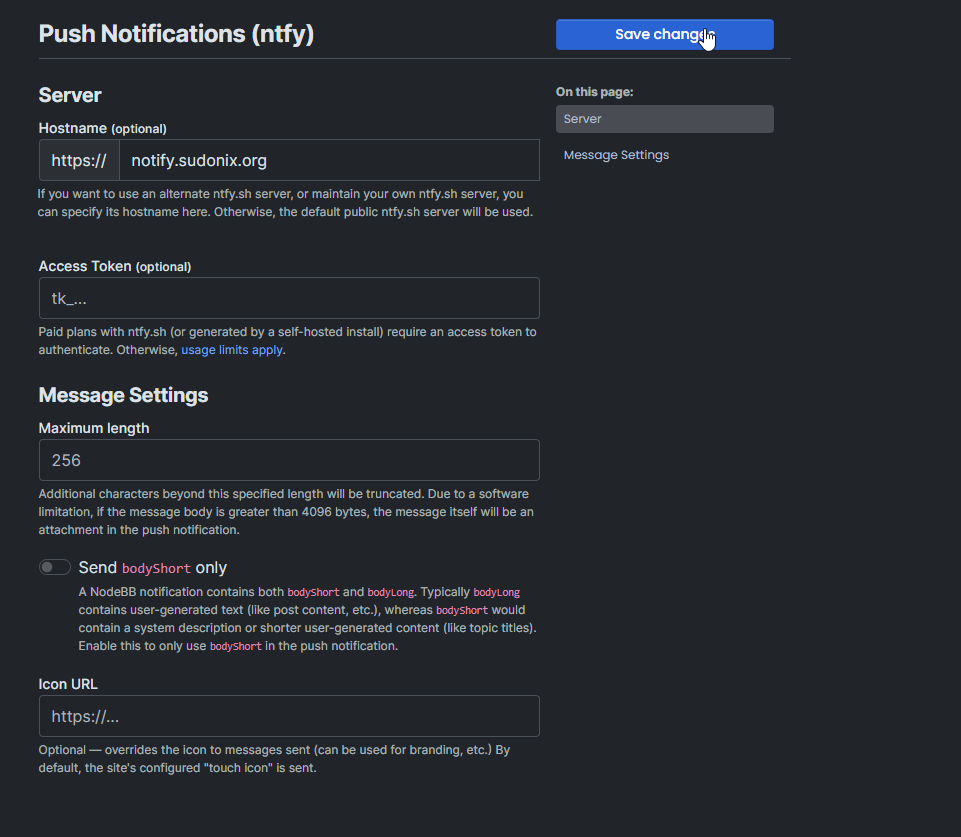
In the ACP, go to Plugins -> NTFY, and set your NTFY URL
Note, that the Access Token isn’t mandatory, but is a good idea to secure the stream. You can generate your own (64bit) here. Use the format in NodeBB as tk_<token>
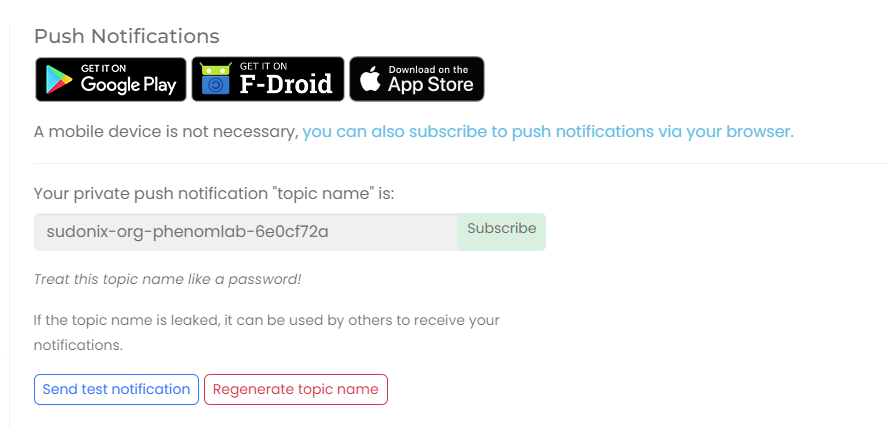
Now go your profile settings in NodeBB and select “Push Notifications”
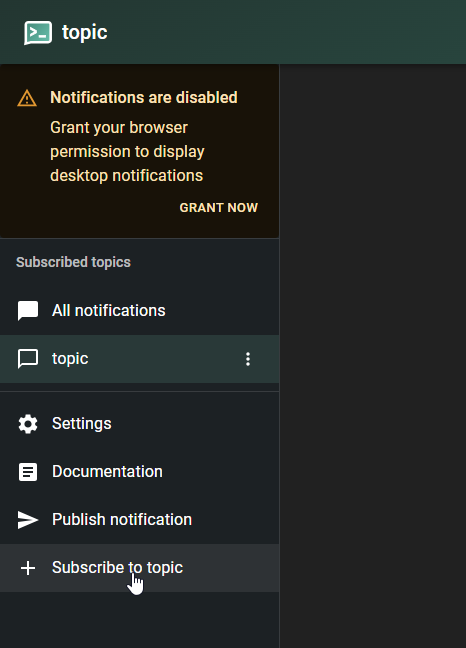
Copy “Private Push Link” and then go to your NTFY self-hosted instance - note, you’ll also see that there is a “Subscribe” button which you can use if you prefer, but you’ll need the latest version of nodebb-plugin-ntfy installed.
Click “Subscribe to a topic”
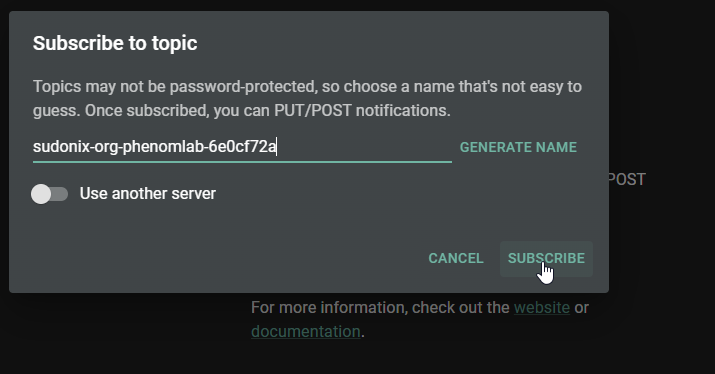
Paste the value you copied previously
Click Subscribe
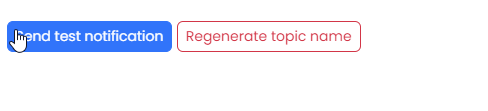
Now go back to your user settings, and click “Send test notification”
Ensure you see the message appear in your new instance
The message should have arrived! If it has, then you’re done.
Well - almost. There is a raft of settings you can apply, such as tokens, ACL’s etc - the guide is very verbose and goes into specific detail, which you can review here
IMPORTANT: if you are using a mobile device, you should install the dedicated apps for Android and iOS rather than use the web versions.
I read on nodebb forum that you self host your ntfy. Would it be possible that you can write a guide for it? I tried it myself but port 80 is already in use. I could maybe configure a different port in the server.yml but then I also would have to configure Nginx I guess? Maybe you could show us the steps you did.
@phenomlab you are very welcome. I have bookmarks but it is also nice to have this info out there for other people to use as well, and also a place I can go to grab it again if I lose my bookmarks haha
")